Piloting a Mech
Attention Pilot! Here are some details you need to know about your new Mech. It’s capable of walking and running, and possibly jumping. Every action you take builds heat, and if you build too much, it will shut down on you from over heating. And it’s filled with weapons capable of destroying your enemies.
Here is a simple Mech to learn from:
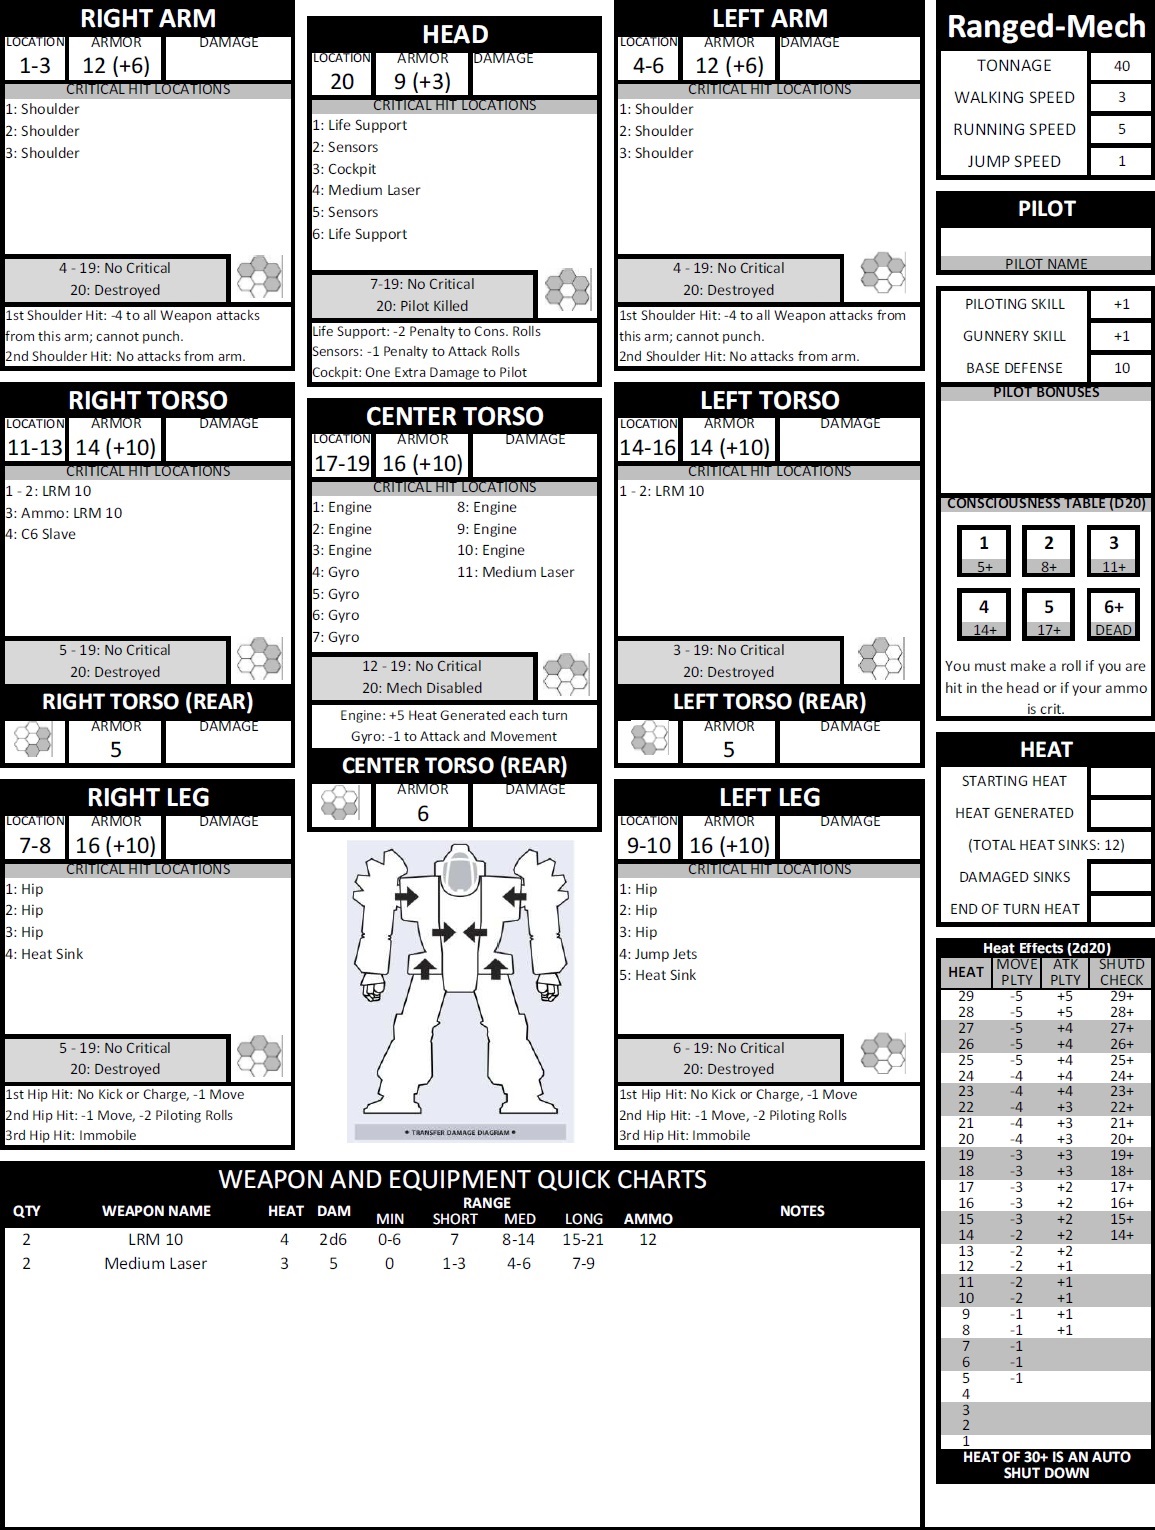
Frame. You’ll notice this Mech’s body is divided into eight different damage areas. There is the Head, Center Torso, Right and Left Arms, Torsos and Legs. Each one of these is a separate location for damage and weapon sights, and a Mech can operate without any of them except the Head or Center Torso. There are complications from losing each area though. Here’s a list of body parts, and their primary use:
- Head: This is where you sit as a pilot. It’s never heavily armored but is hard to hit. If its destroyed, your Mech is done for the combat.
- Center Torso: The mechanical components that keep your Mech working – specifically its Engine and Gyro – are housed in the Center Torso. When it is destroyed, your Mech becomes a very heavy paperweight.
- Right / Left Torsos: Simply pieces of very bulky armor that can house weapons. Right and Left Torsos have no special purpose, but if you lose one, it’s associated arm falls off as well.
- Right / Left Arm: Manipulator arms that hold weapons and allow you to fire at increased arcs. If you have Hands you can engage in physical attacks, or you can slap a big laser and shoot your foes. If you lose your arm, you lose anything it was holding as well.
- Right / Left Leg: Each of these legs has limited room for weapons but attacks are possible. If you have a Foot, you can even kick an opponent and possibly knock him over. If you lose a leg, you are immobile; if you lose both legs, you are prone.
In addition to these, the Torsos also have a Rear listing. Mechs carry much less armor on their backside, as represented by these numbers. A mech hit from behind uses these numbers for armor instead of the normal armor amount, before damaging internal numbers.
Each body part has a few numbers on it. Here’s a definition of what they mean:
- Location: When an attacker hits you, this is where the damage lands. If the attacker says “I did 5 damage to your 13”, he means your Right Torso (location 13) has been hit for 5 damage.
- Armor has two numbers. The first is your Armor Value, and the second (in parenthesis) is your Internal Armor Value. These numbers represent how much damage that part of your Mech can take before falling off. Damage done to the Armor Value has no special effect; it is just damage done. If damage carries over into you Internal Armor Value, it has a chance of generating a Critical Hit. You can read more about Critical Hits in the Combat Phase section. The body part is not destroyed until more damage is done than both numbers; for example, a Head can take 12 points of damage before it is destroyed. If the Mech is attacked from behind you use the Rear Armor Value but the same internals, so this particular Mech can only take 16 total damage (6 Rear and 10 Internal) on its Center Torso if attacked from behind.
- Damage is where you write your damage for the combat.
- Critical Hit Locations determines if something worse than loss of armor occurs from being hit. When an opponent rolls a natural 20 to hit your, or if your internal armor gets damaged (but not destroyed), they roll a critical hit chance. If that die roll matches something in your body part, that part is destroyed or damaged, which can happen even if it was only a minor hit. For more about critical hits, see the Combat Phase section.
- The Transfer Damage Diagram shows what happens to carry-over damage. If your Left Arm only has 6 Internal Armor left and it takes 10 damage, that extra 4 damage is not lost on the arm; it carries over into the next body part, as determined by the table. Arms transfer into Torsos, so your Left Torso would take 4 damage.
- Weapon and Equipment Quick Charts are intended for pilots that know their weapon systems well enough to only need the raw numbers; you can see your weapon’s range, damage and heat generated. It does not list where your weapons are located however.
- Tonnage is the total weight of your Mech. As you get more advanced, it will increase, as will your weapon systems.
- Walking Speed is how fast you can move without generating too much heat or taking a penalty to attack.
- Running Speed is pushing your Mech a bit faster, generating more heat and taking a bigger penalty to attack.
- Jumping Speed is based on your Mech having Jump Jets, which are small rockets capable of giving you a hop speed. Each hex jumped (as part of a walk or run) increases your heat, and decreases your ability to hit a target.
- Piloting Skill is your bonus to attack rolls;
- Gunnery Skill is your bonus to rolls made to control your Mech’s movements; and
- Base Defense is the number an enemy needs to hit you.
- Consciousness Table is the number you need to roll when you are hit in the head with an attack. You can learn more about it in the Combat Phase section.
- Heat is a very important factor in Battletech. Every action you take – from walking to firing a weapon – builds Heat in your Mech’s engine. Every Mech has some capability of draining heat at the end of the round; this is the Total Heat Sinks line. This Ranged Mech can drain 12 Heat every round, so you could Walk (which generates 1 heat), fire both LRM’s (which generate 4 heat each) and one of the Medium Lasers (which generates 3 heat), for a total of 12, which would drain out at the end of the round (assuming he didn’t take heat damage from another Mech’s flamer). If you fired your second Medium Laser, it would put you a 3 heat over. You need to check the chart and see if that has any negative effects (it does not; negative effects do not start until a heat 5+). Either way, your next turn, you start with 3 heat, meaning you may not want to fire any Medium Lasers so you can drain your heat back to 0 at the end of the round.
- Heat Effects come in three forms, based on your starting Heat for the round. Movement Penalty is a penalty to both walking and running; both speeds are reduced by 1 (to a minimum of 0). Attack Penalty is the penalty put on the roll needed, so instead of needing a 10 to hit an opponent, you may need a 15 as your heat is so high its warping your targeting mechanics. Last is a Shutdown Check, which means your Mech is so overheated, it may shut itself down to avoid blowing up. You can learn more about heat in the Clean-up Phase section.
Now that you understand how to read a sheet (at least partially; the only real way to learn is to play the game), destroy some enemies with us!