Combat Phases, pt 2
PHASE 4: COMBAT PHASE
Your chance to blow everything up. At low levels, it’s harder to hit things – you are just not used to your Mech yet, but you will still have your chance for carnage. All attacks happen simultaneously, which is another reason it is good to go last in the round – you don’t want to shoot your weapons at someone who has already been destroyed, and if you know your laser will be destroyed at the end of the round, you’d better use it now. Initiative goes in the same order as movement.
Choosing Weapons: Each of your weapons has four major stats: Location, Damage, Heat and Range.
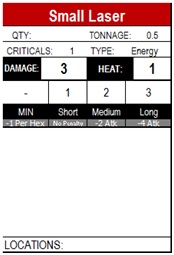
- Location is the body part where the weapon is stored; you can see if a weapon is on your Center Torso or Left Leg
by looking at their “Critical Hit Locations”. Location only has one purpose for attacking: the direction in which the weapon can fire. If a machine gun is located on your Right Torso, it can’t fire at a target on your left side. Each location has a shaded hex diagram; that is the direction in which the weapon can fire. - Damage is how much damage the weapon does if it hits. If it is a number, it does all that damage to one location; if it is more than one D6, it is typically done to multiple locations (unless noted on the weapon). Some weapons have their own rules in addition to just doing damage.
- Heat is how much heat the weapon generates from firing. Some Mechs have the ability to generate more heat than they can dissipate in a round; so it may not be able to fire all of its weapons every round. Heat is generated whether you hit or miss with a weapon.
- Range is the distance in hexes the weapon can be fired at. Minimum range is a penalty based on how close the weapon is; you take a -1 for each hex away (for example, a LRM 5 has a minimum range of 0-6. If a target is one hex away, ie adjacent to you, you would take a -5 penalty to hit it). Short range is firing the weapon without penalty. Medium Range has a -2 to your attack roll, and Long range has a -4. You cannot hit a target with a weapon if it is greater than Long Range.
- There are optional stats as well. Ammo is the number of times you can fire a weapon system per combat; if you have multiple weapon systems on the same ammo, it is total per combat, not total per weapon. Also there are additional notes on specific weapons, which will be explained on their cards.
- Tonnage and Type determine the weight of the weapon, and what type of damage it does, which will not mater in this demo.
Attacking: When you make an attack roll, you roll two separate D20’s. One is for the Attack, and one is for the Location.
The Attack Roll is composed of:
- Your attack roll is 1d20 + your Gunnery Skill
- + Any temporary or item bonus (such as a Targeting Laser)
- – Your movement modifier (color of your die)
- – Their movement modifier (number on their die)
- – Your Heat or other penalties
- – Cover or Terrain Modifiers
- – Range Modifier
As a general rule, you’ll need a modified 10 to hit; as you can imagine, you’ll miss a lot until you get your gunnery skill up. If you hit, the other D20 is your location die. That tells us where you hit with your weapon. If you use missiles or other weapons that do multiple dice of damage, you roll an additional location d20 for each damage die (you don’t have to roll additional attack roll). So a LRM 20, which has 4d6, spreads its damage around 4 separate areas.
 Weapon Facing: Each location has a chart that shows what angles its weapon can attack. Weapons with a (R) indicate it is a rear facing weapon on that torso; so a weapon with the Right Torso (R) means it uses the rear arc for determining its firing range. Also, depending on what angle you attack a target from, you may be unable to hit certain sides of it (for example, if you are directly to a Mech’s left side, all of your right side rolls would instead hit its left side, as you can’t hit its right side.
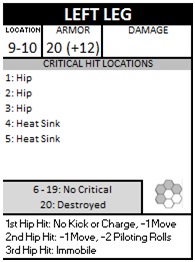
Assigning Damage: Each location has separate hit points, divided by external (junk armor) and internal (important framework). Here’s how to read a card:
- Location is where the damage lands, as noted. If a location is destroyed, all equipment on it is unusable to the Mech (such as ammo and weapons); and any additional damage to the Mech is transferred to the next location (see below).
- Armor has two numbers; one out of and one in parenthesis. The first number is the external armor, which can be damaged all day long without penalty. The second in parenthesis is the internal armor, which is much more vulnerable. If you have damage greater than both numbers combined at the end of the attack phase, that body part is destroyed, and cannot be repaired. Every time your Mech is hit in a body part and you take internal damage, the attacker also gets to make a critical roll (see below).
- When you lose a body part, any damage not absorbed by the armor (or internal armor) is carried over to the next area, as shown in the Damage Transfer Diagram. Arms and Legs transfer damage to their respective Torsos; Right and Left Torsos transfer damage to the Center Torso. If a Mech loses a Torso, the attached leg and arm are unusable as well. When a Mech loses its Head or Center Torso, it is destroyed.
- Rear Torsos work similar to Front facing torsos, except that they have separate Hit Points.
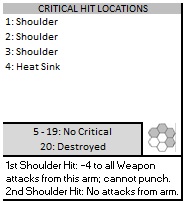 Critical Hit: Every time you roll a natural 20 on the Attack Die, or if you do internal damage to a body part, you score a potential critical hit on the body part. Roll an additional D20, and consult the Critical Hit Locations chart. If the number matches one anything that is not “No Critical”, something bad happens. If it is a weapon, heat sink or jump jet, that item is disabled for the combat. Engines, Gyros, Life Support and similar components have specific penalties listed for them. Ammunition hit is not only destroyed, but explodes as though it was a normal hit; so if a LRM20 Ammo is critically hit, the stored area would take 4d6 damage, potentially carrying over to the next part of the body. If a 20 is rolled on the critical hit die, that body part is permanently destroyed, as are any body parts attached to it. Additionally, ammo explosions create such a blast that they mock the effects of a Head Shot, forcing a Pilot Consciousness Roll (see Head Shots).
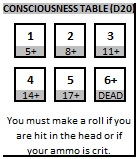 Head Shots: Whenever a character’s Head is hit, the character must make a Consciousness Roll (1d20 + Piloting Modifier). There is a chart on the right side of the page, showing the required roll. Each shot increases in difficulty; the more you get knocked around, the harder it is to stay awake. If you pass out, your Mech shuts down on the next round, and you can attempt to regain consciousness at the end of that round. Every time you take a head shot, you make the roll and mark off one of the Consciousness counters, to increase your next roll. If your pilot has been hit 6 times in the same battle, and lived somehow, he still does from the trauma.
Physical Attacks: In this demo, we are not going to allow Charging, Pushing, or jumping on another Mech’s Head (which is very possible down the road). If your Mech has a hand, you can punch a Mech; if it has a foot, you can kick another Mech. These count as normal weapon attacks. The only exception is the Kick attack; if you hit, the targeted Mech needs to make a piloting check at the end of its turn; if you miss, you need to make a Piloting Check or you will fall.
Repairing Damage: Some Mechs have the ability to repair damage or other beneficial actions via a weapon, such as GEL launchers or a GEL dispenser. You can repair a Mech up to its normal armor value; anything above it is wasted. You cannot repair an item that was destroyed on previous rounds, but you may be able to repair an area that was lost during the current round (for example, if the Mech lost its arm from an attack that round, but the Damage Phase hasn’t happened yet, it may be able to use a GEL dispenser to repair its arm before it falls off). Most GEL packs have three charges per critical location; if you are using them via GEL dispenser or launcher, you must choose each time which to use.